|
|
|
Last Updated: 16th February 2002 - DESIGN CHANGE - See below.
Please don't forget to leave your comments or questions on my forum here .
I hate listening to PC fans so I wanted an effective but quiet cooling solution for my Athlon XP 1700+, especially since my PC sits beside my bed... and my wife. Most heat sinks available for the Athlon take a 60mm fan that is either too noisy or doesn't provide sufficient cooling. Moving up to an 80mm fan can give the best of both worlds but without the aid of an adapter or funnel these fans just won't fit. Adapters and funnels are not very common and vendors that stock them tend to charge a premium for them. Considering a funnel is a very simple piece of plastic I find it hard to justify paying $12 or more for one, and then for shipping charges on top of that! So I decided to make my own.
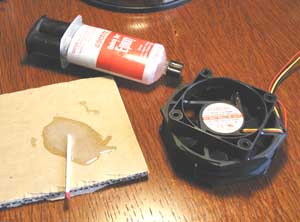
My first task was to come up with a design that would fit my Dynatron copper heat sink which originally had a 60mm fan. With Motherboard Monitor installed I logged the CPU idle temperature for various configurations of fan size (60mm and 80mm) and placement (top and side). I also used a funnel made out of a plastic jar in order to gauge its effectiveness. I was surprised to find that using a funnel actually reduced the cooling effectiveness of the fan. I discovered that the best results were obtained from an 80mm fan placed about an inch above the heat sink blowing down. This gave better cooling than mounting it directly on top, probably because it reduced dead zone caused by the large fan motor. My objective was then to find some way to mount the 80mm fan securely on the heatsink with a space between the two. Here's what I did...
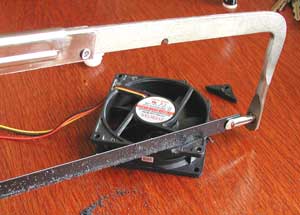
I bought an 80mm case fan for $5 from my local computer store and I set about removing its corners. This wasn't a necessary step but I wanted to reduce the fan footprint and perhaps make the finished article look a little better. If I had wanted to attach a fan grill then I would have left the corners alone, or at least the ones on the top side.
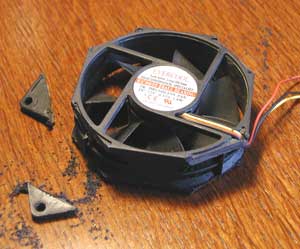
With all corners removed I the buffed the cut edges with a piece of glass paper.
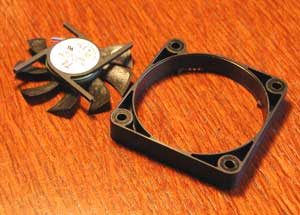
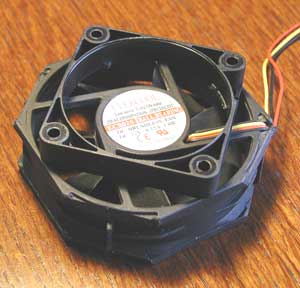
For a spacer/mount I cut the fan from an old 60mm unit to leave just the rim. You will notice that the fan is missing a couple of blades. These ended up embedded in my fingers during the testing phase. A touch of serendipity I think.
I glued the 60mm rim to the 80mm fan using epoxy resin. Superglue may have been OK but epoxy is much better. I buffed the surfaces to be glued in order to increase adhesion. I was careful to glue at all points of contact between the two items and to leave the screw holes accessible through the fan blades. If you're doing this remember to check that the fan will blow through the spacer and not in the opposite direction. Also note that I turned the spacer recesses away from the fan so as not to become air traps.
With the fan finished all that was left was to find four suitable screws and cut them to length. The type and length of screws to use depend on the heat sink.

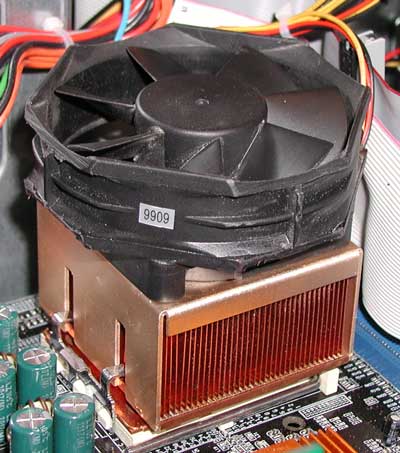
Finally I fitted the fan to the heat sink and fired up my computer. Beforehand, with a 60mm fan my idle temperature was 52C but it was now 46C with no increase in noise.
I wasn't overly impressed with the performance of the "super" fan. It was definitley better than my slow 60mm fan but was no match for my 7200 rpm 60mm delta. My target was to get the idle temp below 40C so that I could overclock the Athon to hopefully the equivalent of an XP 2000+. Considering the temp was regularly around 48C this was no mean task. I got some advice from you guys on various aspects of cooling and from that I decided to go for an exhaling design. In this I would suck the air thru the heat sink and then straight out of the case. This would keep the case cool and avoid the "fan-assisted oven" effect. So here's what I can up with...
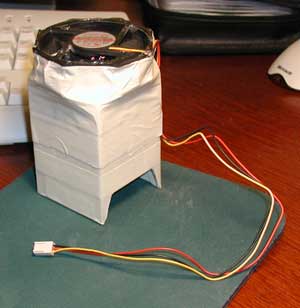
I call this "The Mummy" for obvious reasons, although that's masking tape rather than bandages. I can see the guys with windows in their computer cases fainting at the sight of this. My deepest apologies for exhibiting such a hideous display of technology. In case you have'nt guessed this is a cardboard tower wrapped in tape and topped with my trusted de-cornered 80mm fan. This then pushes over the heat sink like so:
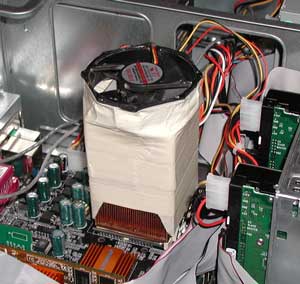
It is very snuggly fitting to ensure 99% of the air flow is thru the heat sink. It doesn't go all the way to the motherboard but rather rests on the heat sink clip and is very stable. This time the fan blows upwards drawing air thru the heat sink. I tried various configurations and found that leaving both sides of the heat sink as open as possible gave the best results. There is of course one thing I've not yet mentioned. Yup, I've gotta cut a hole in the side of my case thru which to expel the air. Hopefully my Dremel rotary tool will handle that but for now I've left the side of the case off. One thing I did observe is that air expelled from one of these fans seems to travel away from the fan at about 45 degrees to the perpendicular. This means that for best results the fan has to be right up against the case hole or fitted with a collar.
"So what is your CPU temp now?" I hear you ask. Well, it's a steady 43C, or to be more precise it's 17C above the system temp. This is good, not great, but definitely an improvement. With the high speed Delta fan I was able to get the temp down to 34C but not without an ear-piercing whine. I think from this point on any improvement will be via a more powerful 80mm fan... or a bigger fan. To this end I've ordered up a more powerful 80mm fan as well as a 120mm one. I expect to have them by next weekend. Watch this space for... "The Mummy Returns" !


 Visitors